ALICE IN ‘ONE’DERLAND – Bubba’s 1st Birthday Party 14
April 13, 2011
Welcome to (pretty much), a step by step guide on throwing an ALICE IN WONDERLAND birthday party for a kid (or adult!) of any age!
Since I was but a wee Phoodie, this was my all time FAVOURITE Disney movie (Lewis Carroll?? Who’s that?!) and it just seemed an appropriate theme for me to choose when I had to throw a little someone their very special 1st Birthday Party. To be more specific, it was actually A Mad Hatter’s Tea Party that we were throwing – so much inspiration in terms of ideas for the event!!! I was EXCITED!
I also branded it an Alice in ‘ONE’derland theme, get it?! First birthday!? ONE – derland!! I often grab ideas from the web, or from mags or from shop windows etc, and whilst I AM SURE someone somewhere in the world has thought of ‘One’derland before for a 1st bday I SWEAR THAT I THOUGHT OF IT whilst sitting alone myself and making one of the signs for the party! I was so proud of having the ideaaaaaa!! *pats self on back then shakes head at how sad that is*
Anyway….I had many a grand plan in the months and weeks leading up to the event, most of which I left nowhere near enough time to execute! In any case, I was reallllly happy with how everything turned out, but honestly, everything came together at the last minute, and hundreds of ideas just fell by the wayside. So…..before reading this, know that although many hands make light work, and I did have heapssssssss of help getting things together (THANK-YOU EVERYONEEEEEEEE!!!!!) it is all definitely very achievable for even the busiest of folk, and it’s simple and basic enough for the creatively challenged!
THE INVITES
One word. Zazzle. Google them, ok don’t bother, here’s their website www.zazzle.com.au – they have a HUGEEEEEE selection of Alice in Wonderland themed invites that you can customise, pay for with a credit card and organise to have delivered to your door. It’s a good idea to think about the wording on the invite too, as this will set the tone for the party and add to the absurdity of the event that is to be the Mad Hatter’s Tea get together.
Bub’s invite looked like this on the front:
On the back of the invite it read:
Please join her for a very happy 1st Un-birthday party in ONEderland!
Address:
Date:
Now don’t be late for this very important date or the Queen will see red and yell “Off with your head!”
RSVP: The White Rabbit – email: ………………………….. mobile: ……………………….
The DECORATIONS
I mean the possibilities here were ENDLESS, but on a budget and a deadline we kept it simple!
Note: AGAIN, stylist to the STARS, Aunty T – thanksthanksthanks – without her we couldnt-a dunnit!
ENTRY SIGN
I made a sign that hung at the entry of our house. It read ‘This way to Phoodie’s Baby’s Onederland’ and there were arrows pointing all over the shop! I googled Alice in Wonderland fonts and then just copied them by eye for the writing. We hung balloons around it too!
BALLOONS AND STREAMERS
We hung balloons all over the front of the house and throughout the garden at the back, where the party took place. I ordered lots of helium balloons in bright colours and also some special red heart balloons, in the spirit of the Queen of Hearts! We also hung multi coloured streamers with the baloons that flapped about and looked pretty in the wind! In general, I just wanted everything to be big, bright and cheerful.
THE MAIN TABLE AND THE GARDEN
I wanted the big, long, tea table from the movie (and the book ofcourse) to be replicated, so we put 2 long tables together and covered them in bright yellow cloths and oversized white doilies. All of the food went on this table. We set the table, again like the film, as though 30 people were coming to sit down and have tea, when in reality we knew no one would actually sit at the table, but rather be running all over the garden and talking in small groups…..BUT as I said, it was moe for the ‘look and feel’ for when guests arrived.
We lined the table with lots of white chairs and hung balloons off the back of each chair.
All of the plates, serviettes and bowls were brightly coloured to match the balloons.
Thanks to Husbies, the garden looked beautiful. He’d spent a lot of time making everything look perfect! He even mowed funny patterns into the lawn AND scattered letters from her name on the grass too!!!! SOOOOO CLEVER!! Mwah!
LOLLY BAGS
The lolly bags were green polka dotted cardboard cartons that I stuffed with all of my favourite sweeties to eat – Freddo frogs, Crunchies, Red Skins, Fantales and more! They were so pretty, I actually wanted them to be on display for the party, but I didn’t want kids rummaging through them before the day was over! So……I grouped them in bundles, packed them in baskets and decorated with white glitter carrots (obviously belonging to the white rabbit) and they were kept on a table on the verrandah where everyone could see them, but it was pretty clear that they were for later, not for now!
Just before everyone left, I moved the baskets filled with lolly bags and carrots down to the lawn near the gate that everyone was walking out of.

ENTERTAINMENT
We had a great clown / magician / face painter / animal balloon entertainer!!! EVERYONE adored her! She even pulled a REAL rabbit out of a hat!
THE FOOD
Being a tea party, I wanted everything to be cute and sorta small, or bite sized if you like. I know myself that when I see a table PACKED with food I become instantly overwhlemed as my eyes say GIMME 10 OF EVERYTHING, but my stomach knows that I can probably not fit that much in! So, the concept of mini foods was a good one, because 1) it fitted in with the tea-party look and 2) it allowed guests to literally eat everything and not be sick-full….just full! Again, seriously, I had a millllllllllion ideas at the start, but with so little time it just was not going to be possible to make everything……soooooooooooooooo here is the abridged version! There was SO much left over that each person exited the event with breakfast, lunch and dinner for the next week!
HONEY JOYS
An oldie but a goodie!
MINI JAM DOUGHNUTS
Probably everyone’s favourite!
MINI CHOCOLATE AND MINI VANILLA CUPCAKES
Decorated with sugared hearts in line with the Queen of Hearts theme!
MINI QUICHE
Hmmmm posssssssssibly my fave of the day!
MINI PIES
Nothing beats a delicious meat pie!
Except perhaps…..
GOURMET CHICKEN SANDWICHES
I CANNOT believe I forgot to take a photo of these! Actually I can, because I stuffed so many into my mouth before I even contemplated snapping anything! But FYI, these were just traditional chicken, celery, mayo on wholegrain – gosh that doesn’t do them justice! Everyone makes these chicken sambos but NO ONE makes them like my Yaya!
TEA / COFFEE CUP SWEETS
Cute, didn’t think anyone would eat them, but rather just admire. BUT PEOPLE ATE THEM. Lots of people! Marshmallow cups with lifesaver handles sitting on Jam pillow biscuits with a freckle of ‘cappuccino froth’ on top!
TEAPOT, HEART AND CROWN CHILDREN’S SAMBOS – Vegemite, Ham and Cheese and Cream Cheese
BROWNIES
Who can resist a triple choc fudge brownie!?
WHITE MERINGUES AND WHITE RABBIT
A centrepiece to end all centrepieces!
Until the REAL centrepiece arrived……
THE CAKE
Although of course, this IS food, it comes under it’s own category for many a reason. Firstly, it took more time to make this than ALL of the other food put together. Secondly, I was more nervous about making this then I have been about making anything in my life. Thirdly, I am proud. So there. :)
I also took more pics of this that anything else as lots of the feedback I get from readers is that they like seeing stuff step by step and this was the only item that I took step by step pics for!! :) Although in the rush, and the stress of it all, I missed a few steps along the way, so please forgive!
ANYWAY……………
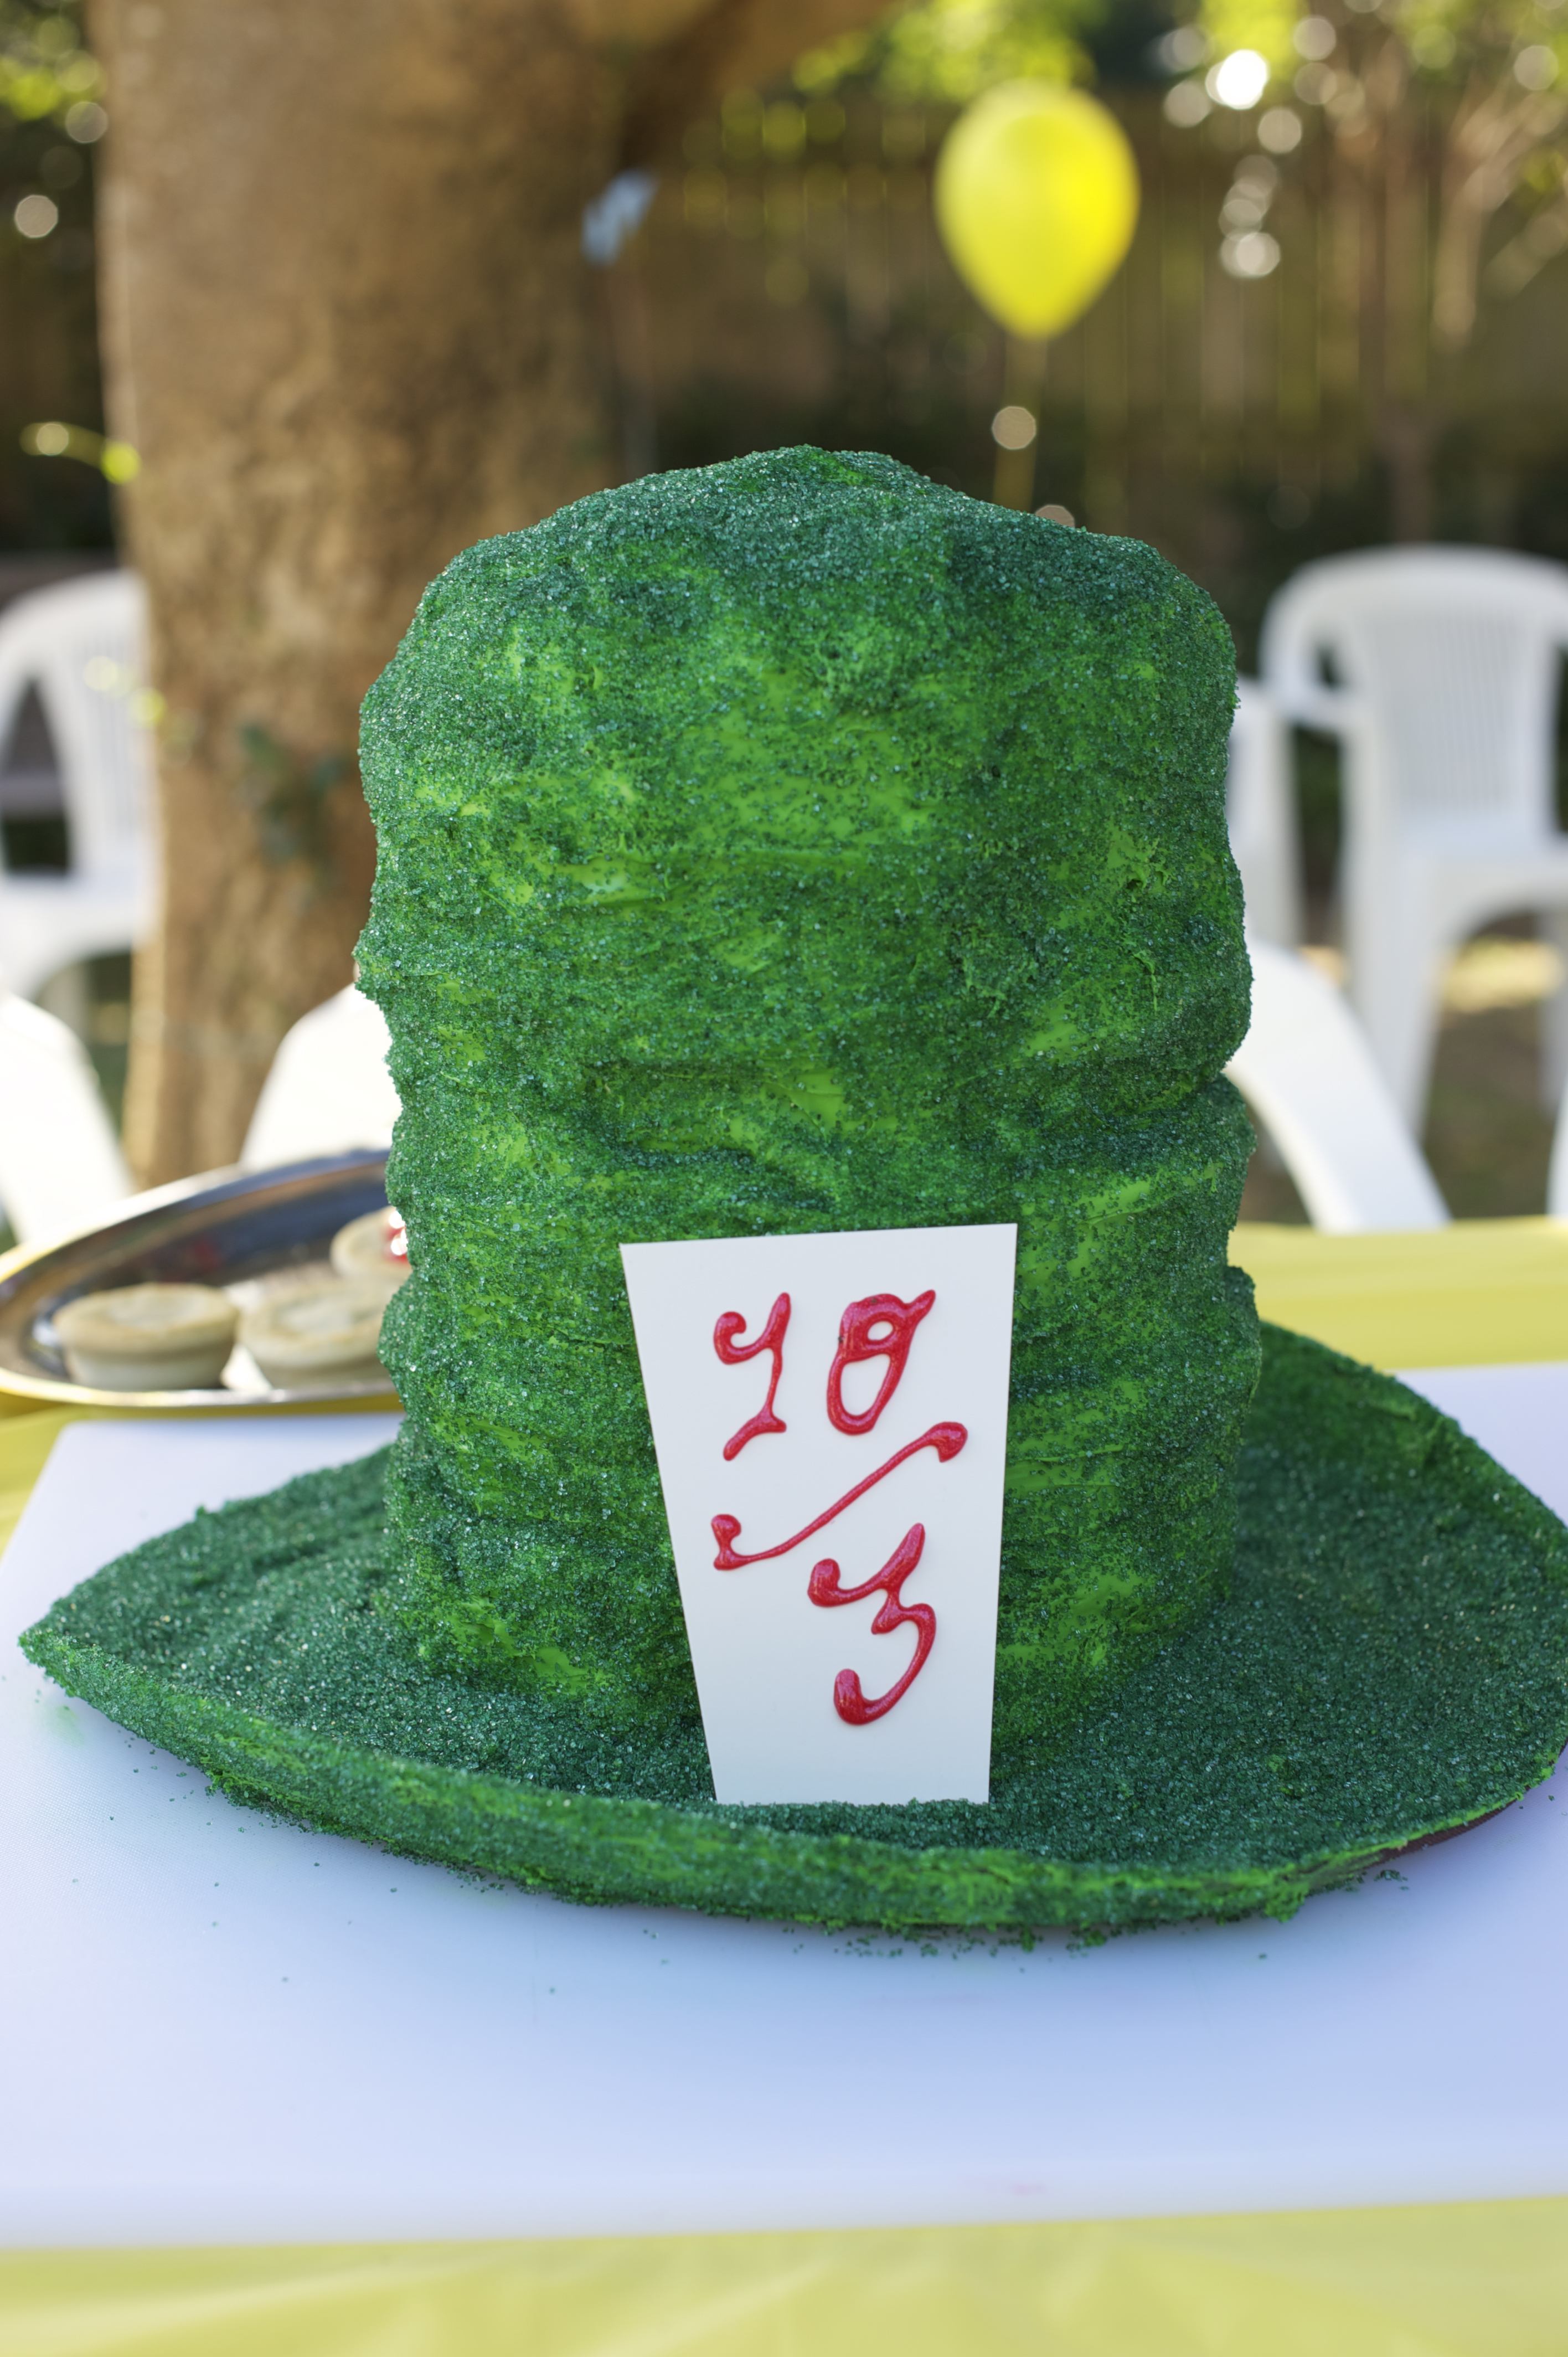
In summary, the cake = 6 white chocolate mud cakes, sandwiched together with multi-coloured vanilla buttercream icing, then totally covered in fondant and coated with green vanilla buttercream icing, then DOUSED and I literally mean DOUSED with edible green gliter!
My first step was to bake the 6 mudcakes. That’s right, SIX MUDCAKES before the work has even begun! As I know how to bake mudcake with my eyes closed (I always use Donna Hay’s recipe,) and as I knew the real work was in the REST of the cake, i.e forming it, coating it, doing the fondant work and icing it, I decided to be a cheat and use packet mix. Yes, yes I know. But the point of this entire mad hatter cake recipe was never the mud cake. And let me tell you I’m not so sure that making 6 packet mix mudcakes was really that much quicker than doing 6 of my usual Donna Hay ones but anyway…….
Once the mudcakes were done, I covered each one with a layer of plain white fondant icing and drizzled the tops in a basic chocolate ganache (cream and chocolate mixed together). This helped the next coat of multicloured icing to stick, hence providing the cake with more stability as the layers went up! I then set the cooled, fondant/ganache covered mudcakes to the side and got out my cake board.
For the rim of the hat cake, I used an ACTUAL hat! Cheap, easy, and gave the perfect up turned curve that I required.
The next thing I did was to cut the top off the hat and glue the rim to the cake board – keeping in mind my final product. Did I want the cake set to the side of the board so I could decorate and write a birthday message on there too? Did I want the cake centred? Did I want it to the front of the board? to the back? I made my deciison first and then I stuck the rim down.
Once the rim was glued to the board I was ready to start building the mud cake tower. I had baked 8 inch mudcakes and so the hole in the centre of my hat that I cut out also needed to be 8 inches! Once the hole was cut, I was ready to insert my first mudcake into the hole and push it right down so it wa flush against the board. I then iced it with my first colour – PINK!
I then grabbed another mud cake, with white fondant and a drizzle of ganache on top, and placed it DIRECTLY on top of the pink iced mudcake, pushing down firmly. I chose to ice this one BLUE.
Did it again – iced the top YELLOW.
Did it AGAIN – iced the top ORANGE.
Did it, yep, again – iced the top PURPLE!
The 6th cake was then placed on top of this purple icing and pushed down firmly, but not tooooo firmly! The biggest risk throughout all of this – at this stage – is the cake collapsing! The icing is semi-fluid and causes the cakes to move a bit so it’s VERY IMPORTANT that every time you add a cake you PUSH down and ensure it is centred!
Now came the fondant. UNFORTUNATELY I only took 2 pics of this as I was panicking a bit and shouting orders at my poor mother and sister who were helping out! Both pics are TOTALLY UGLY and not worthy of featuring in this post.
In summary, the ENTIRE outer layer of the cake was coated with plain white vanilla fondant. I rolled it out to about a 4mm thickness and then vertically applied it to the cylinder of the hat as well as the top and the hat rim. I pushed down with all of my fingers to ensure that the fondant would hug the ‘curves’ of the cake to give the hat an old, vintage, crinkled look – I DEFINITELY didn’t want a smooth hat with straight sides!!!
My sister, yes MY SISTER (there you go sister, CREDIT) then painted the hat with a pastry brush, with green buttercream icing! She was VERY CAREFUL not to apply it too thick.
And THEN it was GLITTER TIME! We threw it, we dropped it, we splashed it, we did everything and anything with it! The aim was to ABSOLUTELY completely cover the whole thing with bright green edible glitter! The mess?! You’ve never seen anything like it!
Oh it was sparkly!
I then got my edible red glitter sugar pen and wrote my happy birthday message on the board, next to the cake. I cut out a piece of cardboard to write the traditional 10/6 size tag for the hat, but I made it 10/3 as her bday is March 10th!
The cake looked so awesome sitting out there in the Mad Tea Party arena! It was a hit with the adults and kids alike!!
The time finally came to sing HAPPY BIRTHDAY which was lovely! A moment I will never forget! Then it was cake cutting time – PLEASE DON’T COLLAPSE!!!!!!!!!!!!!
AND IT DIDN’T!
Considering the cake was 30 stories high, most people just wanted half a piece! which was still equivalent to 3 pieces of cake!
So, here I am , FINALLY at the end of the post! I hope it gives you readers wanting to throw your own Mad Tea Party a few ideas! We had an excellent day, the birthday girl really enjoyed herself and Mummy and Daddy were very proud of her! 1! All grown up!








14 comments
You know this is brilliant, right? That cake is inspired beyond belief! Hoping the day was as magical as it looks…
Awwwww! Thanks Tori! The day was TOTALLY magical….in every way! :)
Are you the best mum ever, or what?!?! This is so amazing. All that food! Great photos too, which I’m sure your little girl will appreciate in years to come xx
Thanks Jane!! And thanks for the name ideas this arvo!! :)
I love the whole concept is awesome but the cake is just brilliant!! Love it!!
Thank-you!!!!!!!!! :)
You just rock! Yes you do! The love & joy you put into your passions shine through & through… I have made many B’day cakes over 40 years of parenting & grandparenting…. And this one takes ..tah, dah.. THE cake!
Denyse! You are very, very sweet :) Like my cake! :) Thank-you!!! :)
FINALLY got time to check this post out … and it was worth the wait! I’ll be doing something a bit like this for my daughter’s birthday party soon. She wants a “Hyper Happy Birthday Hullabaloo” with everyone wearing fluro colours and loads of mayhem (her idea). I’ll probably do the cake stack but I’ll colour each cake differently to give it a bit more bizarre-o-ness!
Thanks for the ideas Phoodie … and I hope your little Alice had a most delightful day!
Thanks Karen!!
Oh please also post some pics of the Hyper party – that sounds AWESOME!!!! :) I already have a million ideas ticking away in my head for that!!! Fun!
[…] before Easter this year, Dad and stylist to the Stars, T, (who was instrumental in putting together this) spent 4 hours stuffing, rubbing, slathering, coating and marinating the lamb with 3000 kilos of […]
[…] ALICE IN ‘ONE’DERLAND – Bubba’s 1st Birthday Party […]
[…] If you enjoyed this post, you may also want to check out the one I wrote after my daughter’s 1st bday party – click here! […]
[…] note: If you loved this birthday party, I’m sure you will also like my Alice in Wonderland Post, my American Diner Birthday Party Post, My Space Themes Party Post and lots […]
leave a comment